Actions
Connect your assistant to your own systems. Custom actions let it call your HTTP API mid-conversation; presets are ready-made abilities you just switch on.
What actions are
An action is something the assistant can DO during a conversation, beyond answering from its knowledge base.
A custom action is an HTTPS request you define: a name, a description, a URL and optional inputs. When a visitor asks something the action can answer (an order status, stock availability, a delivery date), the assistant fills in the inputs, calls your endpoint and works the JSON response into its reply.
A preset is a built-in action maintained by Breezaro. You do not configure any URL; you just switch it on. The first presets are Call an operator and Product search.
Build your first custom action
Five steps from an empty form to a working action. Have the endpoint URL from your own API ready.
- Create the actionIn the dashboard, open Custom actions and choose New action. Name it Order status and describe it: Look up an order by its number and return its shipping status.
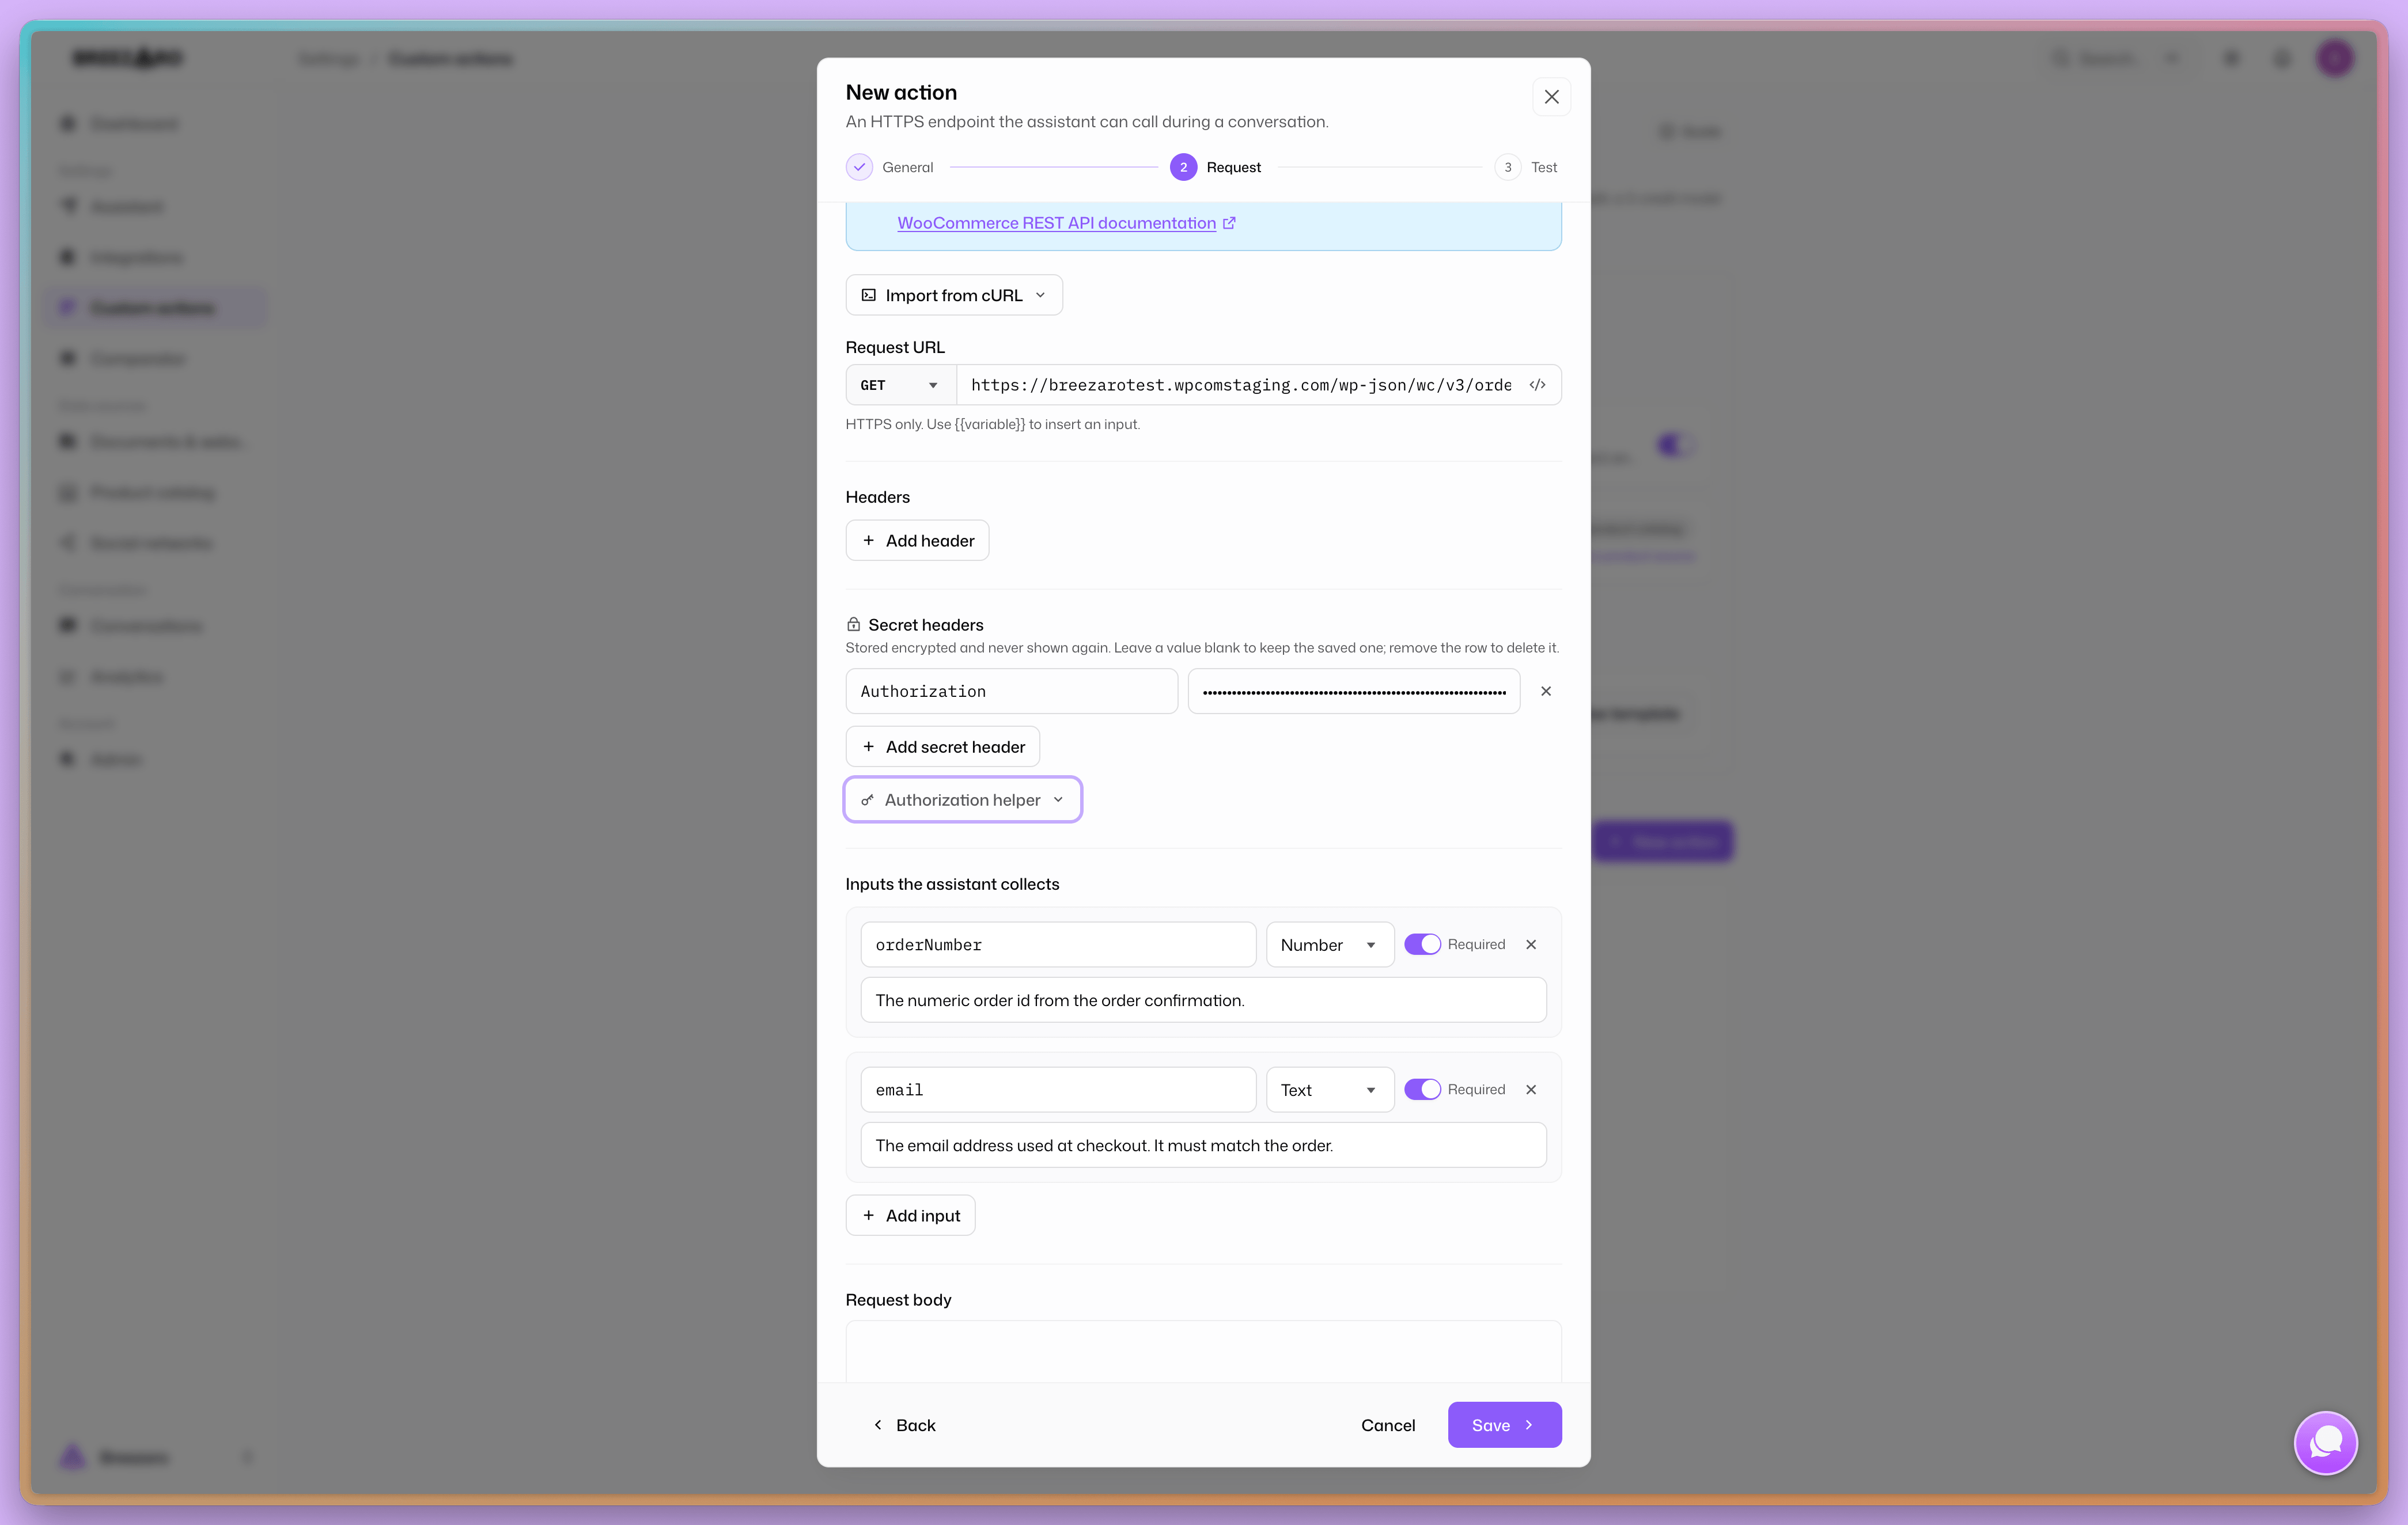
- Point it at the endpointChoose method GET and paste the URL of your endpoint. HTTPS is required, and the host cannot contain a placeholder. Use {{variable}} anywhere in the path or query to insert an input.
- Add the inputAdd an input named orderId with a short description (The customer's order number). The assistant extracts its value from the conversation and sends it as a query parameter.
- Test itRun the built-in test with a sample orderId. You will see the exact response the assistant would receive. An action cannot be enabled until a test has passed.
- Enable itFlip the switch. From now on, when a visitor asks about their order, the assistant calls your action and answers with live data.
Send the conversation along
Anywhere in the URL, a header or the body you can write {{conversation.id}} and Breezaro replaces it with the id of the conversation the request came out of. It is filled in by us, never by the assistant, so it is always the conversation that is really running and not one the model named.
This is what lets you tie a record in someone else's system back to the chat that produced it. Send it in whatever field the other side keeps and hands back: Cal.com takes a "metadata" object and returns it on its own webhook, so a booking made through the assistant arrives carrying the conversation it came from. Open that id in Conversations and you are looking at the chat itself.
Write actions
An action that changes something in your system never runs on the assistant's word alone. The visitor confirms it first, with a button.
When the assistant decides a write action applies, it does not call your endpoint. It puts a card in the chat instead: the name of the action first, then every value it would send, one row per input. The visitor reads the exact date, email or amount before anything happens.
Under those values sit two buttons, Confirm and Cancel. The press on Confirm is what releases the call: it is recorded by Breezaro, and only that record lets the action run. The assistant cannot press it, and it cannot accept a sentence like "yes, go ahead" in its place.
Cancel drops the proposal and nothing is sent. The conversation carries on as normal, so a visitor who wanted a different date just says so and gets a fresh card. Each card is good for one use.
Import from cURL
If you already have a working curl command (from your API docs or a tool like Postman), paste it into Import from cURL in the action editor. The method, URL, headers and body are prefilled for you.
Presets
Ready-made actions you switch on per assistant.
Call an operator: when a visitor asks for a human, is stuck or frustrated, the assistant escalates immediately without asking any extra questions, notifies your team (email, push notification and a dashboard notification with the reason, plus the visitor's name if they already gave it) and pauses AI replies in that conversation. The visitor can keep writing; everything is saved and waiting for you in the inbox.
The pause ends when an operator takes over the conversation (or resumes the assistant). Repeated requests in the same conversation are rate-limited, so your inbox is not flooded.
Product search: available automatically when your assistant has a product catalog connected. The assistant searches your products and recommends them with live prices and availability. Manage it under Sources → Products.
Start from a template
A faster path to a working action: pick a template from the presets gallery and the editor arrives pre-filled.
The presets gallery includes full templates, not just toggles. WooCommerce order status is the first one: choosing "Use template" opens the custom action editor with the name, description, request, inputs and suggested response fields already filled in.
What it creates is an ordinary custom action that belongs to you. Review, edit, test or delete it like any other action, and it counts toward the same action limit.
What the AI sees
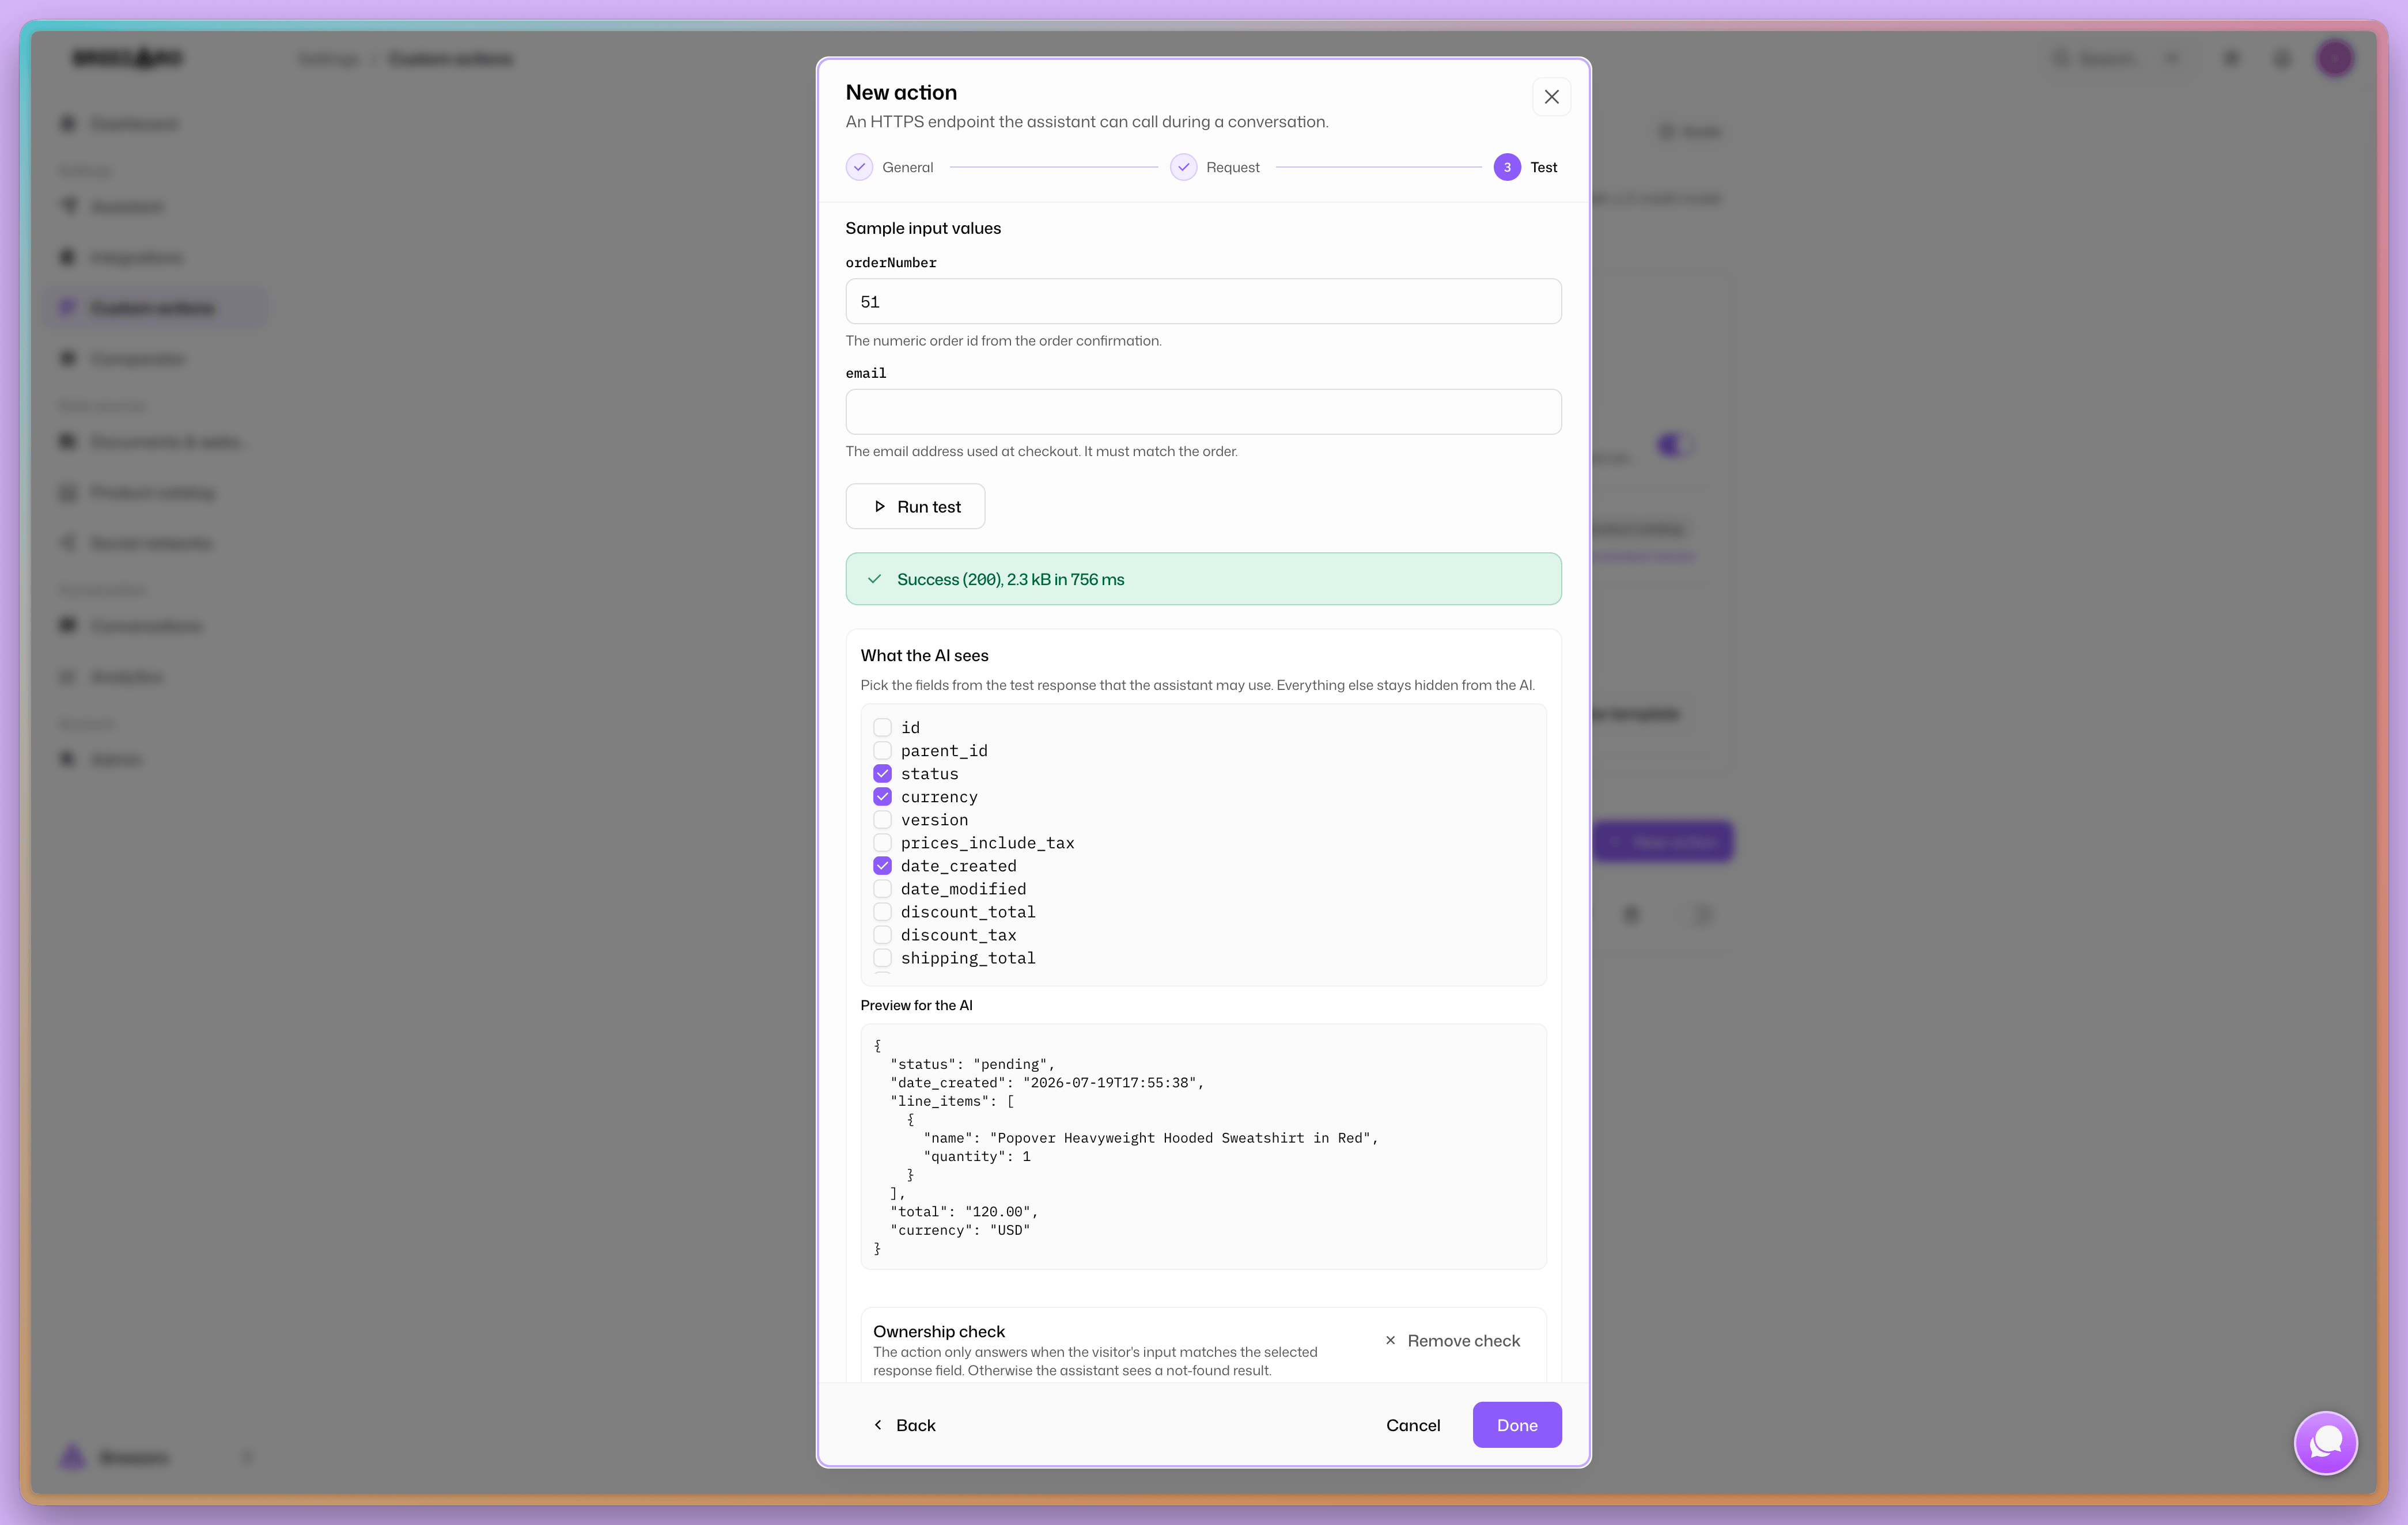
Run a test call, then tell the assistant exactly which parts of the response it is allowed to see.
After a successful test, the response appears as a checkbox tree. Tick the fields the assistant may use in its replies; everything you leave unchecked never reaches the model, no matter what the endpoint returns.
Ownership check
An optional rule that stops one visitor from reading another visitor's data through the same action.
Pick an input and a response field that must match, for example the visitor's email against the order's billing email. The action only answers when they match, exactly like the WooCommerce order status template does by default. A check can combine one or more conditions, requiring all of them or just one to match. Conditions that read the verified identity form their own group, and that group always has to hold: "just one" can choose between two identity conditions, but it can never let a value the visitor typed stand in for one.
On a mismatch the assistant sees the same result as a genuine not-found, so it cannot tell a wrong order number from someone else's order. Repeated failed attempts in the same conversation are throttled, so guessing does not pay off.
A response that returns a list is checked record by record: pick a field inside the list and every record has to carry the verified value somewhere beneath it, or the whole answer is refused. That matters when the only thing scoping a list is a filter in your query, because a filter that stops being applied comes back as a normal 200 full of other people's records. An empty list passes, since it holds nothing to show.
One record without verification
The match above does not have to be an email. When a customer can check out as a guest, there may be no email on file for an identity check to verify against, so use the order itself instead. Add the order number and one more detail only its owner would know, the postal code it ships to, or the last digits of the phone on the order, as two ordinary inputs, and check both together in your endpoint before returning anything. It is the same ownership check described above, just matched against the order's own details instead of a contact address, so it needs no verified visitor, no card and no toggle: it works today.
The two patterns mean different things when they come back empty. A lookup gated on a verified identity, "my orders", found nothing under that one visitor's verified contact. It does not mean the visitor has no orders at all: the order may sit under a different address, or none. Word the action's description so the assistant offers the order-number lookup, or a human, next, rather than telling the visitor they have nothing on file.
Verified visitors
Gate an action on a verified identity so a lookup like "my orders" answers with that one visitor's own data, never whatever they happen to type.
Turn on "Requires a verified visitor" in the action editor and the assistant still offers to help; it just will not run the action until the visitor's identity is confirmed. Verification happens once per conversation: either the visitor types a code you email to the address they give you, or your own server vouches for who they are with no interaction at all (Signed identify, below). Once confirmed, the identity stays with that one conversation; a new chat starts over.
For the emailed code, the first time the assistant needs a verified identity it opens a card asking for an email address. Submitting it sends a 6-digit code to that address and the card asks for the code next; the right code completes verification and the assistant retries the action. Signed identify skips this entirely: there is no card, because the identity already arrived confirmed when the page loaded.
Once verified, reference the identity anywhere in the action's URL, headers or body with four placeholders:
- {{visitor.email}}
- The verified email address.
- {{visitor.name}}
- The visitor's name, when the verification method provided one.
- {{visitor.externalId}}
- Your own customer id, present only after signed identify.
- {{visitor.phone}}
- The verified phone number, present only on WhatsApp, formatted as E.164 (for example +14155552671).
Signed identify
For a visitor already logged in on your own site: your server vouches for who they are, so nothing appears in the chat to slow them down.
This is the same pattern used by Intercom, Crisp and Zendesk. Your backend signs a short-lived assertion about the visitor with a secret only it knows and hands it to the widget through a small public API, window.breezaro, alongside the existing embed tag. There is no email, no code and no card: verification happens the moment the page loads. Operators who do not need this keep their existing one-line snippet unchanged; the two-part shape below is only for signed identify.
Generate a signing secret once, in Channels → Widget; it is shown exactly once, as plain text, and that is the exact value your server uses as the HMAC key, nothing to decode or transform first. Rotating it invalidates every assertion signed with the old secret immediately: a visitor already mid-conversation keeps the identity they already verified, but any new identify() call signed with the old secret starts failing the moment you rotate.
<script>
  const BREEZARO_APP_ID = 'YOUR_APP_ID';
  window.breezaro =
    window.breezaro ||
    function () {
      if (arguments[0] === 'identify') {
        let resetId = null;
        try {
          const reset = JSON.parse(
            localStorage.getItem('breezaro-widget_reset_' + BREEZARO_APP_ID),
          );
          resetId = typeof reset?.id === 'string' ? reset.id : null;
        } catch {}
        arguments[3] = { resetId };
      }
      (window.breezaro.q = window.breezaro.q || []).push(arguments);
    };
  breezaro('identify', {
    email: 'jan@example.com',
    name: 'Jan Novák',
    externalId: '12345',
    issuedAt: 1785400000,
    nonce: '2c12df4ca7384da4aeb0902655b13c6f',
    hmac: '<computed on your server>',
  });
</script>
<script
  src="https://breezaro.com/breezaro-widget.js"
  data-app-id="YOUR_APP_ID"
  defer></script>
The inline block only queues the call; the loader script, unchanged apart from now sitting after it, drains the queue once it initialises, so the order of the two tags, or a slow network on the second one, never loses the call. Everything in that object except hmac is plain data your server already has; hmac is the one field your server must compute next.
hmac is HMAC-SHA256 over a canonical string built from six fields, joined with a newline, in exactly this order:
appId\nexternalId\nemail\nname\nissuedAt\nnonce
- App id
- signed, but never sent inside the identify() call. It is the same value as your embed snippet's data-app-id; the widget already knows it and attaches it for you.
- Absent externalId or name
- an empty string in that position, not the word null and not a missing line. The canonical string always has exactly six lines.
- issuedAt
- the current time in whole Unix seconds, not milliseconds, converted straight to its decimal string.
- The signature
- HMAC-SHA256 of that string, hex-encoded, keyed with the secret exactly as shown. Do not hex-decode the secret first; it is used as plain text.
- Maximum age
- accepted up to one hour after issuedAt, with five minutes of tolerance for clock drift ahead. Anything older, or further in the future, is rejected the same way a wrong signature is, with no way to tell which one happened.
- Control characters
- a newline or other control character anywhere in appId, externalId, email, name or nonce gets the whole payload rejected before the signature is even checked.
- Length limits
- appId up to 64 characters, externalId, email and name up to 200 each, nonce from 16 to 100 characters, and email must also parse as a valid address. Breaking any of these fails before the signature is ever checked, with a generic error that does not say which field or limit was the problem.
- nonce
- a fresh cryptographically random value for every payload, included as the sixth and final canonical line. It prevents two devices minted in the same second from receiving the same bearer credential; never derive it only from issuedAt.
Nothing else is covered: not the visitor's chat, not their browser session, nothing you have not already put in one of those six fields.
const { createHmac, randomUUID } = require('node:crypto');

function signVisitorIdentify({ appId, email, name, externalId, secret }) {
  const issuedAt = Math.floor(Date.now() / 1000);
  const nonce = randomUUID();
  const canonical = [
    appId,
    externalId ?? '',
    email,
    name ?? '',
    String(issuedAt),
    nonce,
  ].join('\n');
  const hmac = createHmac('sha256', secret).update(canonical).digest('hex');

  return { email, name, externalId, issuedAt, nonce, hmac };
}
Call this with your app id, the signing secret from Channels → Widget, and whatever you know about the visitor, then render its return value into the identify() call before you send the page. Mint a fresh issuedAt and nonce, and therefore a fresh hmac, on every page load rather than reusing one payload across visits.
Limits and security
Custom actions are deliberately constrained so a misconfigured endpoint cannot hurt your assistant or your visitors.
- HTTPS only, GET and POST only. Requests to private or internal network addresses are blocked.
- Responses must be JSON, up to 16 KB, and arrive within 10 seconds; anything else is cut off.
- Secret headers are encrypted at rest and never shown again after saving.
- The assistant may call at most two actions per reply.
- An action must pass a test before it can be enabled.
- Actions are available on the Pro plan and higher (and during a trial).
- Each action call is billed as one extra reply at your assistant's model rate (a 1-credit model adds 1 credit, a 3-credit model adds 3).
- Actions that change data are proposed first and run only after the visitor presses Confirm on the card, at most once per proposal, and only in the website chat widget.